Vue v-model is a directive that creates a two-way data binding between a value in our template and a value in our data properties.
A common use case for using v-model is when designing forms and inputs. We can use it to have our DOM input elements be able to modify the data in our Vue instance.
Let's look at a simple example that uses a v-model on a text input to keep a ref in sync with the value in our input.
When we type in our text input, we'll see that our data property is changing.
The difference between v-model and v-bind
Two directives that is commonly switched up with v-model is the v-bind directive.
The difference between the two is that v-model provides two-way data binding.
In our example, this means that if our data changes, our input will too, and if our input changes, our data changes too.
However, v-bind only binds data one way. Meaning that we can pass data to a component, but if we type in our input - our original value won't be changed.
In the example above, v-bind would set the input to value. But if we type in our input, those changes are not saved in state. The next time that our component re-renders, our input will be reset to the current value from our component.
This may seem like a small difference, but it means that our data might not be in sync with what's actually in the input that it's supposed to model. We always want to make sure that our state is in alignment with our data - so be careful when choosing between v-model and v-bind.
An example of using v-bind is passing props where we want to pass a reactive value to a child component.
<script setup>
import { ref } from 'vue'
import Foo from './components/Foo.vue'

const count = ref(0)
</script>

<template>
  <!-- pass count to Foo as a prop -->
  <Foo :count="count" />

  <!-- or using `:` shorthand -->
  <Foo :count="count" />
</template>
Modifiers for v-model
Vue provides a couple of modifiers that allow us to change the functionality of our v-model.
.lazy
By default, v-model syncs with the state of the Vue instance (data properties) on every input event - which means every single time the value of our input changes.
The .lazymodifier changes our v-model so it only syncs after change events. The change event is triggered when a change is commited. For a text input, this happens when our input loses focus.
This reduces the number of times our v-model is trying to sync with our Vue instance – and in some cases, can significantly increase performance.
.number
Often, our inputs will automatically type the input as a String – even if we declare our input to be type number.
One way to ensure that our value is handled as a Number is to use the .number modifier.
According to the Vue docs, if the input changes and the new value cannot be parsed by parseFloat(), then the last valid value of the input is returned instead.
.trim
Similar to trim methods in most programming languages, the .trim modifier removes leading or trailing whitespace before returning the value.
Chaining Modifiers
Each of these can be added like this and can even be chained together.
Get Notified When Courses Launch
The first batch of courses is scheduled to come out soon:
- Fullstack Nuxt (Supabase, Drizzle, TypeScript)
- Writing Better Vue Composables
- Building a Nuxt Content Site
Be the first to know when courses drop (and maybe even get early access) by joining the waitlist.
Using Vue v-model in custom components
Alright, now that we know the basics of v-model inside of forms/inputs, let's look at an interesting use for v-model – creating two-way data binding between components.
In Vue, data binding between components has two main steps:
- Passing our data from our parent
- Emitting an event from our child to update the parent instance
Using v-model on a custom component allows us to do both of these stops with one directive.
<custom-text-input v-model="value" />

<!-- IS THE SAME AS -->

<custom-text-input :modelValue="value" @update:modelValue="value = $event" />
value acts as our source of truth. We bind it to our child component to set the value of our input, and when our input changes - we update with value = $event - which sets value to the new value of our input.
Let's continue with our example of using v-model for a custom text input called CustomTextInput.vue.
The default name for a value passed using v-model is modelValue – which is what we'll be using for our example.
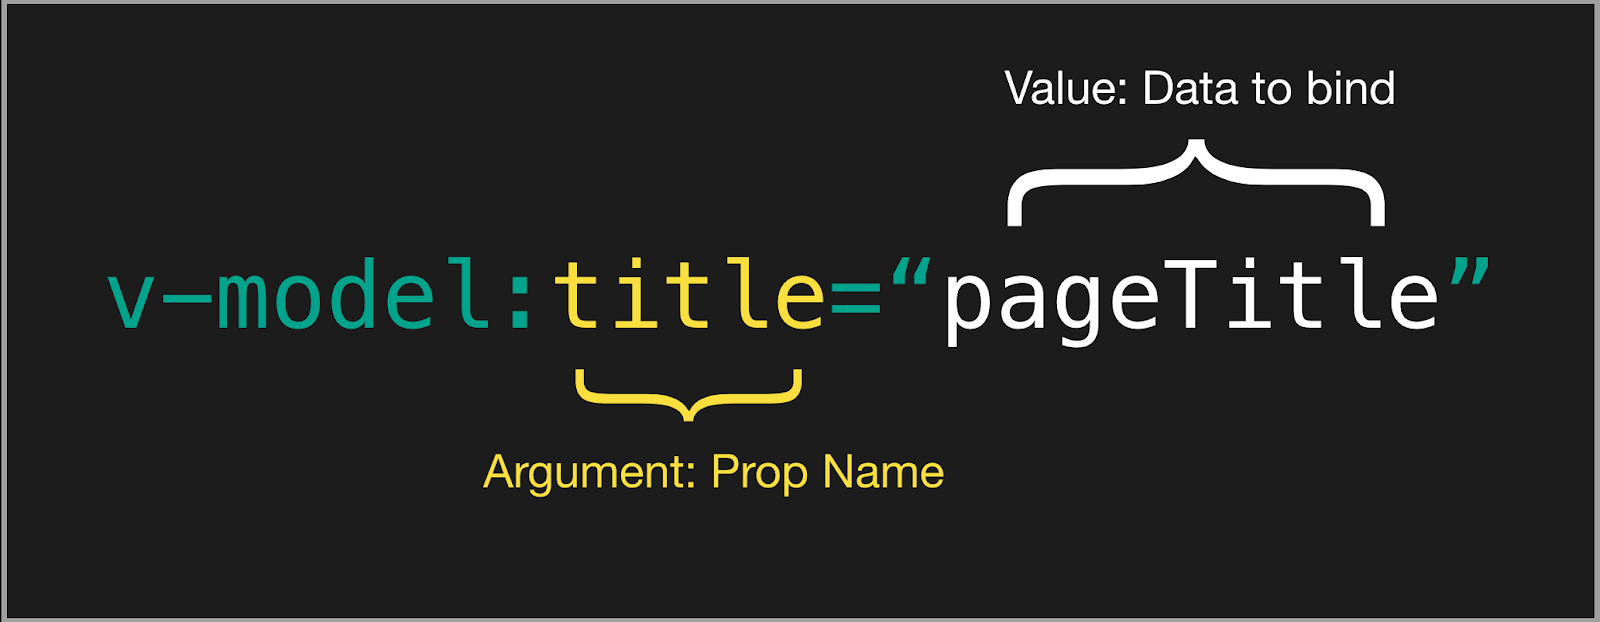
However, we can pass a custom model name like this. When we use a custom model name, the name of the emitted method will be update:name and the prop passed will be name.
<!-- We can name v-model, but for our example leave unnamed. -->
<custom-text-input v-model:name="value" />
Here's a handy graphic from the Vue docs to summarize it.
Using v-model from our custom component
Once again, there are two things we have to do inside our child component - which for us will be CustomTextInput.vue:
- Accept our v-model value as a prop
- Emit an update event when our input changes
<script setup>
defineProps({
  modelValue: String,
})

// defines what events our component emits
defineEmits(['update:modelValue'])
</script>

<template>
  <div>
    <input
      type="text"
      placeholder="Input"
      :value="modelValue"
      @input="$emit('update:modelValue', $event.target.value)"
    />
  </div>
</template>
Now that our child component is set up, we can add v-model where we declare our component
defineModel macro
In Vue 3.3 and later, we can use the defineModel macro which simplifies the process of defining the props and emitting the events for v-model. Internally, it's doing the same thing that we did in the previous example.
<script setup lang="ts">
// creates a 'modelValue' prop that emits an 'update:modelValue' event when it changes
const model = defineModel()

// if we want to use a custom name for our model, we can pass it as an argument
const count = defineModel('count')
</script>
<template>
  <div>
    <input v-model="model" type="text" placeholder="Input" />
  </div>
</template>
Tips for using v-model
Now that we've seen a basic example of using `v-model`` to bind data between two components, let's take a look at some more advanced ways to use the v-model directive.
Using v-model multiple times for one component
Since we can name our v-model, we can use multiple of them on a single component.
We have to be sure to name each one uniquely so the props/events are unique!
Let's add a second v-model to our input called lastName.
<script setup>
import { ref } from 'vue'
import CustomTextInput from './CustomTextInput.vue'

const firstName = ref('')
const lastName = ref('')
</script>

<template>
  <!-- Unnamed v-model still uses `modelValue` -->
  <CustomTextInput v-model="firstName" v-model:last-name="lastName" />
  <p>Value: {{ firstName }}</p>
  <p>Last Name: {{ lastName }}</p>
</template>
Custom modifiers for our v-model
As we've discussed, there are a few modifiers built into Vue. But there will come a time when we're going to want to add our own.
Let's say we want to create a modifier that removes all spaces from our input. We'll call it no-whitespace
<custom-text-input v-model.no-whitespace="value" v-model:lastName="lastName" />
Inside our input component, we can capture the modifier using the props. The name for custom modifiers is [name]Modifiers. So if we want to add the modifier on our lastName.
const props = defineProps({
  modelValue: String,
  lastName: String,
  lastNameModifiers: {
    default: () => ({}),
    'no-whitespace': () => {},
  },
})
To apply this modifier, we need to transform our value before emitting it to our parent, so instead of our @input handler calling $emit directly, we want to use a custom method - I'll name it emitValue.
Here, before we call $emit, we want to check our modifiers. If our no-whitespace modifier is true, we can modify our value before emitting it to the parent.
<script setup>
const props = defineProps({
  modelValue: String,
  lastName: String,
  lastNameModifiers: {
    default: () => ({}),
    'no-whitespace': () => {},
  },
})

// defines what events our component emits
const emit = defineEmits(['update:modelValue', 'update:lastName'])

// handles emitting our formatted event
const emitValue = (evt) => {
  let val = evt.target.value
  if (props.lastNameModifiers['no-whitespace']) {
    val = val.replace(/\s/g, '')
  }
  emit('update:lastName', val)
}
</script>

<template>
  <div>
    <label> First Name </label>
    <input
      type="text"
      placeholder="Input"
      :value="modelValue"
      @input="$emit('update:modelValue', $event.target.value)"
    />
    <label> Last Name </label>
    <input
      type="text"
      placeholder="Input"
      :value="lastName"
      @input="emitValue"
    />
  </div>
</template>
Whenever our input changes and we have a space, it will be removed in the parent value!
Conclusion
Hopefully, this guide taught you something new about Vue v-model.
In its simplest use case like forms and input data, v-model is a really simple concept. However, when we begin to create custom components and work with more complex data, we can really unleash the true power of v-model.