Allowing users to create their own profiles is a common use case for many modern web apps. Trying to set this up on your own custom database can a little tricky – dealing with persistence, O-Auth, and encryption.
Luckily for us Vue developers, we can easily add Firebase to our Vue app. This means we can create a simple Vue and Firebase authentication system that supports so many of these standard use cases out of the box.
In this tutorial, we’re going to cover the ins and outs of adding Firebase authentication to your Vue 3 app.
We’ll be building a simple Vue app that lets users sign up for an account, log in to their account, and make sure that certain pages are restricted for user access only.
Let’s jump right in!
See the final code for this article.
Creating our Vue and Firebase authentication project
At a high level, there are two different parts for our application:
- A Vue frontend that allows us to create accounts, sign-in, and view content
- A Firebase project that handles authentication
To make our Vue app, we’re going to be using Vue 3 and Vite. If you haven’t used either before, I recommend checking out our introduction to Vite tutorial first.
Building our Vite app
First, we need to create our app. So let’s open up a terminal and say npm init @vitejs/app
Then, we can add our project name and since Vite is framework-agnostic, we have to select Vue as our template.
Now, let’s run these commands to install all of our dependencies and start our project.
bash
cd vue-firebase-authentication
npm install
npm run dev
Our Vite app is now up and running. We can navigate to http://localhost:3000 and see the default starter app in our browser.
We’ll be setting up the rest of our app including multiple pages in a little bit, but let’s first go ahead and configure our Firebase project.
Setting up our Firebase project
Inside our browser, let’s navigate to the Firebase Console and give our project a name.
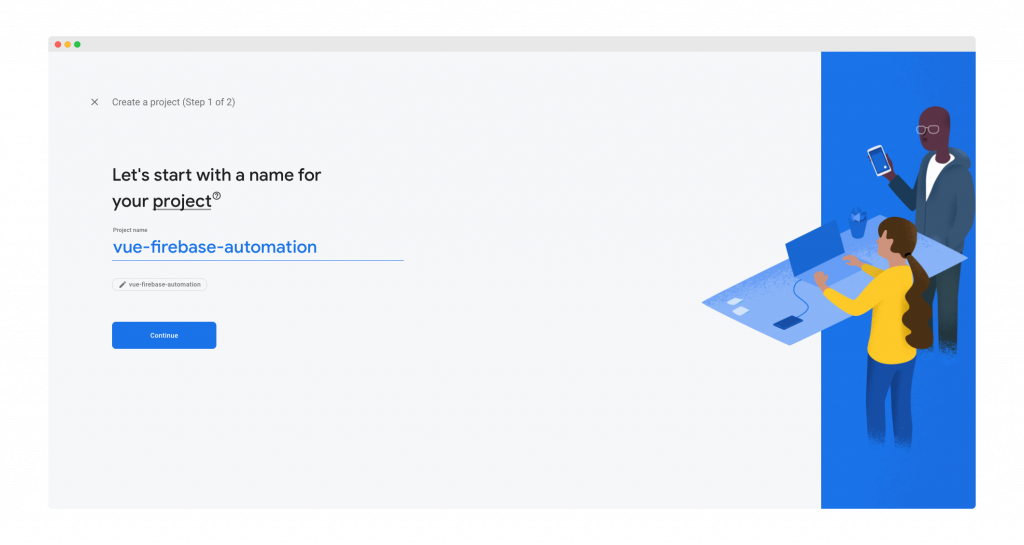
On the next slide, it doesn’t really matter whether or not we choose to add Google Analytics. For this tutorial, it’s not necessary so I’m not going to.
After the project is created, let’s create a Firebase web app by clicking this button.

And that’s all the setup we have to do for now to create our Firebase project.
Using Vue Router to create pages
Our Vue app will be pretty simple – only consisting of four pages:
- A
/homepage with some basic template - A
/registrationpage to create counts - A
/sign-inpage for existing users - A
/feedpage that requires a logged-in user
So let’s create these files inside of a folder called src/views. We’ll be filling each of these throughout the rest of this tutorial, but for our router to work, we need this to exist.
We’re going to be using Vue Router to handle all of these routes. First, we have to install the Vue Router version compatible with Vue 3. In our terminal, let’s say…
bash
npm install vue-router@4Then, we can define all of our routes inside a src/router/index.js file.
js
import { createRouter, createWebHistory } from "vue-router";

const router = createRouter({
  history: createWebHistory(),
  routes: [
    {
      path: "/",
      component: () => import("../views/Home.vue"),
    },
    {
      path: "/register",
      component: () => import("../views/Register.vue"),
    },
    {
      path: "/sign-in",
      component: () => import("../views/SignIn.vue"),
    },
    {
      path: "/feed",
      component: () => import("../views/Feed.vue"),
    },
  ],
});

export default router;
This code uses Vue Router to map URL paths to Vue components inside of the src/views folder.
Finally, we have to use these routes and this has two steps:
- Telling our root Vue app instance to use the router we just created
- Declaring a router-view element inside of
App.vue
We can tackle the first task inside of src/main.js, we have to store the value of createApp and then use the .use method to add our router. Then, we can just call .mount to add our Vue instance onto our #app element.
js
import { createApp } from "vue";
import App from "./App.vue";
import router from "./router";

const app = createApp(App);

app.use(router);

app.mount("#app");
That’s it.
For the second step, we have to open up App.vue and replace our template code with a <router-view> element. And this renders whatever component the router resolves to – meaning that it will change based on the current path in the URL.
vue
<template>
  <router-view />
</template>
Awesome, now if we navigate any of the routes we declared, we’ll see the corresponding Vue component.
Creating a Navigation Bar
To make it easy for us to get around the different pages of our app, let’s add some different links to our App.vue file. For this, we’ll use the <router-link> element of Vue Router.
Since our App.vue file contains our router view, this navigation section will be available across all the different pages of our app.
vue
<template>
  <div>
    <nav>
      <router-link to="/"> Home </router-link> |
      <router-link to="/feed"> Feed </router-link> |
      <router-link to="/register"> Register </router-link> |
      <router-link to="/sign-in"> Login </router-link> |
    </nav>
    <router-view />
  </div>
</template>
And this is the result. It’s not the prettiest, but it has all the functionality we need for this example. We can click around and access our different pages.
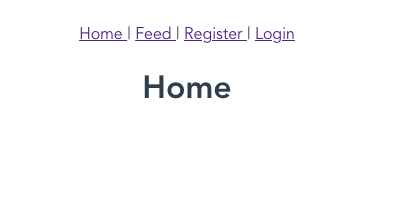
One thing to note is that since we haven’t set up authentication, we can access our feed page before we even log in!
So lets fix this.
Adding Firebase to Vue 3
With all of the different components of our application created, we can get to the exciting part: integrating Firebase into our Vue 3 app.
To do this, we can use the Firebase npm package. Let’s go back to our terminal and add it.
bash
npm install firebaseWith this installed, we can easily add it to our main.jsfile. Inside, let’s import our Firebase npm package.Then let’s grab that configuration code that Firebase generated a few steps ago, and we can just copy and paste it into our main.js file.
js
import { createApp } from "vue";
import App from "./App.vue";
import router from "./router";
import firebase from "firebase";

/* code from our Firebase console */
var firebaseConfig = {
  apiKey: "",
  authDomain: "",
  projectId: "",
  storageBucket: "",
  messagingSenderId: "",
  appId: "",
};

// Initialize Firebase
firebase.initializeApp(firebaseConfig);

const app = createApp(App);

app.use(router);

app.mount("#app");
**And that’s all we need to add Firebase into our project!**Now, let’s see how to use its authentication features in our Vue app.
Firebase authentication in Vue
Firebase gives us several different options for user authentication. We’re going to keep it simple and work with email/password accounts for now.
So in our Firebase console, let’s navigate to the authentication tab and make sure that the email/password option is enabled.
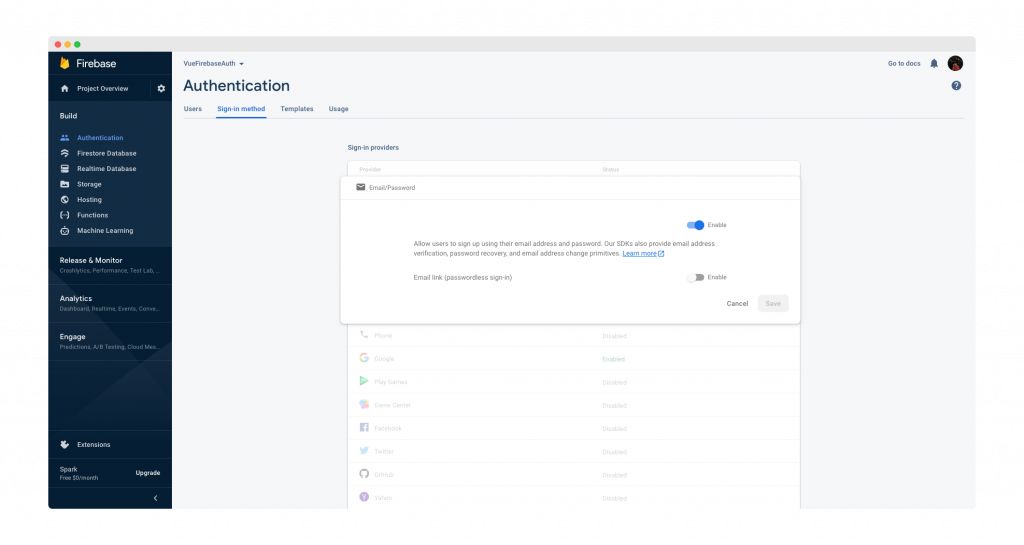
Okay – now we’re ready to create our first user.
User registration
For registration, we’re going to be working with our Register.vue component. Let’s just add a text input for email, a password input, and a submit button that calls a createAccount method. We’ll be using v-model to connect our inputs to our JavaScript data.
vue
<template>
  <h1>Create an Account</h1>
  <p><input type="text" placeholder="Email" v-model="email" /></p>
  <p><input type="password" placeholder="Password" v-model="password" /></p>
  <p><button @click="register">Submit</button></p>
</template>

<script setup>
  import { ref } from 'vue'
  import firebase from 'firebase'
  const email = ref('')
  const password = ref('')
  const register = () => {
  }
</script>
If this syntax looks unfamiliar to you, check out this video on the experimental script setup syntax.
Okay – now to connect to our Firebase project.
After importing Firebase into this component, all we have to do is call the createUserWithEmailAndPassword function from the Firebase authentication API.
This method takes our email and password values and then returns a Promise, which we can use then and catch on like any other Promise.
If our account is successfully created, we’re going to log the account information and then route the user to the /feed page. If there’s some error, we’ll just catch it and print it out.
vue
<template>
  <h1>Create an Account</h1>
  <p><input type="text" placeholder="Email" v-model="email" /></p>
  <p><input type="password" placeholder="Password" v-model="password" /></p>
  <p><button @click="register">Submit</button></p>
</template>

<script setup>
  import { ref } from 'vue'
  import firebase from 'firebase'
  import { useRouter } from 'vue-router' // import router
  const email = ref('')
  const password = ref('')
  const router = useRouter() // get a reference to our vue router
  const register = () => {
    firebase
      .auth() // get the auth api
      .createUserWithEmailAndPassword(email.value, password.value) // need .value because ref()
      .then((data) => {
        console.log('Successfully registered!');
        router.push('/feed') // redirect to the feed
      })
      .catch(error => {
        console.log(error.code)
        alert(error.message);
      });
  }
</script>
Let’s try this out and see what happens.
If we type a valid email address and a password at least 6 characters long, we should see our message in our console after submitting.
And if we go to our Firebase console, we should see our new account in our database!
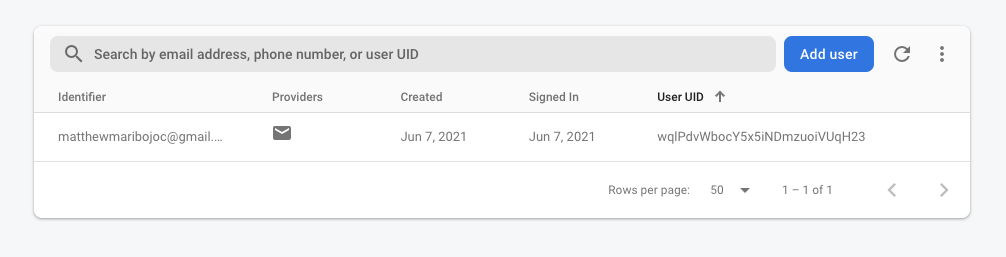
Exciting!!
Right after creating an account, we are automatically logged in, and the account information is stored in firebase.auth().currentUser. By default, this is saved in local storage to create some persistence across different sessions (e.g. if you open the app in another tab, you’ll still be logged in).
User sign-in
So now that we have a way of creating a new account, we can use a pretty similar approach to sign in to an existing one.
Inside SignIn.vue, let’s just copy and paste the Register.vue component that we just made.
The one change we have to make is instead of calling the createUserWithEmailAndPassword method, we use signInWithEmailAndPassword. Other than that, it should work exactly the same.
vue
<template>
  <h1>Login to Your Account</h1>
  <p><input type="text" placeholder="Email" v-model="email" /></p>
  <p><input type="password" placeholder="Password" v-model="password" /></p>
  <p><button @click="signIn">Submit</button></p>
</template>

<script setup>
  import { ref } from 'vue'
  import firebase from 'firebase'
  import { useRouter } from 'vue-router' // import router
  const email = ref('')
  const password = ref('')
  const router = useRouter() // get a reference to our vue router
  const signIn = () => { // we also renamed this method
    firebase
      .auth()
      .signInWithEmailAndPassword(email.value, password.value) // THIS LINE CHANGED
      .then((data) => {
        console.log('Successfully logged in!');
        router.push('/feed') // redirect to the feed
      })
      .catch(error => {
        console.log(error.code)
        alert(error.message);
      });
  }
</script>
Awesome! Now we can create a new account and then sign in to that account.
One feature we can add here is displaying some simple error messages if something goes wrong like:
- We pass an invalid email
- We pass a valid email, but there is no associated account for it
- Our password is incorrect
We can capture these cases inside of our catch block. Firebase Authentication has four error codesfor the signInWithEmailAndPassword method that can be accessed via error.code.
auth/invalid-email- Thrown if the email address is not valid.auth/user-not-found- Thrown if there is no user corresponding to the given email.auth/wrong-password- Thrown if the password is invalid for the given email, or the account corresponding to the email does not have a password set.-auth/user-disabled- Thrown if the user corresponding to the given email has been disabled (we’re not using this one)
We can easily display some error messages with a paragraph element, reactive message property, and a switch block depending on the error code.
vue
<template>
  <h1>Login to Your Account</h1>
  <p><input type="text" placeholder="Email" v-model="email" /></p>
  <p><input type="password" placeholder="Password" v-model="password" /></p>
  <p v-if="errMsg">{{ errMsg }}</p>
  <p><button @click="signIn">Submit</button></p>
</template>

<script setup>
  import { ref } from 'vue'
  import firebase from 'firebase'
  import { useRouter } from 'vue-router' // import router
  const email = ref('')
  const password = ref('')
  const errMsg = ref() // ERROR MESSAGE
  const router = useRouter() // get a reference to our vue router
  const signIn = () => { // we also renamed this method
    firebase
      .auth()
      .signInWithEmailAndPassword(email.value, password.value) // THIS LINE CHANGED
      .then((data) => {
        console.log('Successfully logged in!');
        router.push('/feed') // redirect to the feed
      })
      .catch(error => {
        switch (error.code) {
          case 'auth/invalid-email':
              errMsg.value = 'Invalid email'
              break
          case 'auth/user-not-found':
              errMsg.value = 'No account with that email was found'
              break
          case 'auth/wrong-password':
              errMsg.value = 'Incorrect password'
              break
          default:
              errMsg.value = 'Email or password was incorrect'
              break
        }
      });
  }
</script>
Logging out a User
Logging out a user in Firebase is ridiculously simple, all we have to do is call firebase.auth().signOut() and the user will be signed out.
Let’s add another button to our navigation bar that calls a signOut method. And since we only want to show this when a user is logged in, we can use a ref that changes every time our authentication state changes. We’ll go more into depth on this onAuthStateChanged method in the next section.
For now, when our button is clicked, we just want to call our signOut method.
vue
<template>
  <div>
    <nav>
      <router-link to="/"> Home </router-link> |
      <router-link to="/feed"> Feed </router-link> |
      <span v-if="isLoggedIn"
        >>
        <button @click="signOut">Logout</button>
      </span>
      <span v-else>
        <router-link to="/register"> Register </router-link> |
        <router-link to="/sign-in"> Login </router-link>
      </span>
    </nav>
    <router-view />
  </div>
</template>

<script setup>
  import { ref, watchEffect } from 'vue' // used for conditional rendering
  import firebase from 'firebase'
  import { useRouter } from 'vue-router'
  const router = useRouter()
  const isLoggedIn = ref(true)
  // runs after firebase is initialized
  firebase.auth().onAuthStateChanged(function(user) {
      if (user) {
        isLoggedIn.value = true // if we have a user
      } else {
        isLoggedIn.value = false // if we do not
      }
  })
  const signOut = () => {
    firebase.auth().signOut()
    router.push('/')
  }
</script>

<style>
  #app {
    font-family: Avenir, Helvetica, Arial, sans-serif;
    -webkit-font-smoothing: antialiased;
    -moz-osx-font-smoothing: grayscale;
    text-align: center;
    color: #2c3e50;
    margin-top: 60px;
  }
</style>
As soon as we hit sign out, we are no longer logged in. This also means that our conditional rendered content in our navbar will all change to the logged-out state.
Verifying Logged In Status
To check if a user is logged in, we can again use the firebase.auth().onAuthStateChangedmethod. This will either give us an object if the user is logged in OR null if there is no user logged in.
The reason we need to use this listener is because while Firebase is initializing, our current authenticated user (which is stored in firebase.auth().currentUser) is null. Since we don’t know how long Firebase will take to initialize on the sessions first load, if we simply check currentUser, we will not have a value even if we are properly logged in.
Our onAuthStateChanged observer waits for all asynchronous actions (like initialization) to resolve before running, meaning that we are getting the most accurate state of our application.
So inside our Feed.vuepage, which is the one we want to be limited to logged-in users. We can just check if our observer gives us a null value. If it does, we can use a similar programmatic Vue Router navigation to redirect our app to the login page.
We also want to make sure to remove our authListener whenever our component is unmounted.
vue
<template>
  <h1>Feed</h1>
  <h3>This page is for users only</h3>
</template>

<script setup>
  import firebase from 'firebase'
  import { useRouter } from 'vue-router'
  import { onBeforeUnmount } from 'vue'
  const router = useRouter()
  const authListener = firebase.auth().onAuthStateChanged(function(user) {
      if (!user) { // not logged in
          alert('you must be logged in to view this. redirecting to the home page')
          router.push('/')
      }
  })
  onBeforeUnmount(() => {
      // clear up listener
      authListener()
  })
</script>
Alright – let’s see this in action. Let’s make sure that we’re logged out and try to access our feed page.

Awesome. The fact that Firebase authentication comes with this persistent user data built-in makes it super easy for us to manage sessions.
We can also use this logged-in status to only display the navigation link to the Feed when the user is logged in using the same isLoggedIn data property.
html
<span v-if="isLoggedIn">
        <router-link to="/feed"> Feed </router-link> |
</span>
Now, our router-link for the /feed page will conditionally render depending on the authentication state.
Final Thoughts
Of course, this is only really the beginning of the possibilities that can be added to a Vue Firebase Authentication system. But just by understanding these core concepts, you can build the foundation for an integrated frontend/backend system.
One extension that you would have to add for production apps is adding validation to the registration forms. On the backend, Firebase throws an error if we pass an invalid email or an insecure password, but with frontend validation with Vuelidate, we can catch these problems before we even make our API call.
We can also set our own password rules – requiring special characters, numbers, and really whatever kind of custom validations.
If you’re new to Vuelidate, check out our video explaining how to use it in Vue 3!
Another great extension would be to take full advantage of Firebase’s O-Auth systems to allow your users to log in with a Google account, Twitter, or other social media. This is a great way to improve your sign-up rate as it makes the whole registration process take just a few clicks.
But for this tutorial, we’ve learned how to create a Vue 3 project with Vite, Firebase project, and then integrate the two in order to create an authentication system.
If you’re interested in learning more specifics about Firebase authentication or using Firebase with Vue in general, let me know down in the comments and who knows
But until next time, happy coding!