One of the new features of Vue 3 that has been talked about for a while is the idea of Portals – or ways to move template HTML to different parts of the DOM. Portals, which are a common feature in React, were available in Vue2 under the portal-vuelibrary.
Now in Vue 3, there is native support for this concept using the Teleport feature.
In this tutorial, we’ll cover:
- The purpose of Teleport
- A basic example of Teleport
- Some cool code interactions
Here’s an example of what we’ll be making.

And this is the DOM using Teleport. As you can see, there is this portal-target div outside of our Vue app where our template code is being “teleported”.
Okay! Let’s just jump right in.
Purpose of the Teleport
The first thing we have to understand is when/why this Teleport function can come in handy.
When working with larger Vue projects, it becomes important to organize your codebase in a logical manner. However, when dealing with certain types of components like modals, notifications, or tooltips, the logic for the template HTML may be in a different file than where we would want to render the element.
In fact, a lot of the time, these elements are much easier to manage when they are handled entirely separately from the DOM of our Vue app. All because handling the positioning, z-index, and styling of nested components can get tricky due to handling the scope of all of its parents.
This is where the Teleport function comes in handy. We can write Template code in the component where it’s logic is located – meaning we can use a component’s data or [props](https://learnvue.co/2020/08/an-introduction-to-Vue 3-props-a-beginners-guide/). But then render it outside of the scope of our Vue app entirely.
Without using Teleport, we would have to worry about event propagation to pass the logic from a child component up the DOM Tree, but now it’s much simpler.
Let’s look at an example.
How Vue Teleport works
Let’s say that we have some child component where we want to trigger a notification to pop up. As we were just discussing, it’s simpler if we render this notification in an entirely separate DOM tree than Vue’s root #appelement.
The first thing we would want to do is go to our index.html and add a <div> right before </body>.
html
<body>
  <div id="app"></div>
  <div id="portal-target"></div>
</body>
Next, let’s start creating our component that triggers the notification to render. If you’re not familiar with Vue 3, definitely check out this Vue 3 introduction!
vue
<template>
  <div class="portals">
    <button @click="showNotification">Trigger Notification!</button>
    <teleport to="#portal-target">
      <div class="notification">
        This is rendering outside of this child component!
      </div>
    </teleport>
  </div>
</template>

<script>
  import { ref } from 'vue'
  export default {
    setup () {
      const isOpen = ref(false)

      var closePopup

      const showNotification = () => {
        isOpen.value = true

        clearTimeout(closePopup)

        closePopup = setTimeout(() => {
          isOpen.value = false
        }, 2000)
      }

      return {
        isOpen,
        showNotification
      }
    }
  }
</script>

<style scoped>
  .notification {
    font-family: myriad-pro, sans-serif;
    position: fixed;
    bottom: 20px;
    left: 20px;
    width: 300px;
    padding: 30px;
    background-color: #fff;
  }
</style>
In this snippet, when the button is pressed, a notification will be rendered for 2 seconds. However, our main goal is to use Teleport to get the notification to render outside our Vue app.
As you can see, Teleport has one required attribute – to
The to attribute takes in a valid DOM query string and it can be the:
- id of an element
- class of an element
- data selector
- a responsive query string
Since we passed it in #portal-target, our Vue app will locate the #portal-target div we included in index.html and it will teleport all the code inside the portal and render it inside that div.
This is what our result should be.
 Inspecting the elements and looking at the DOM makes it very clear what’s happening.
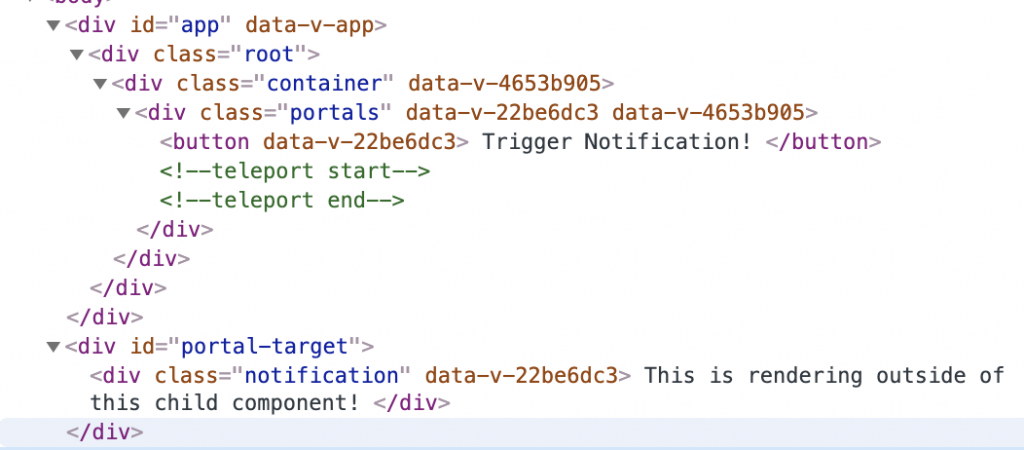
Basically, we can use all of the logic from our VuePortals component, but tell our project to render that template code somewhere else!
Conclusion
And that’s a quick introduction to Vue Teleport. I’ll likely write an in-depth guide to some more advanced use cases in the near future, but this should be a great place to get started working with this cool feature!
For a more in-depth tutorial, definitely check out the Vue 3 documentation.
If you have any questions, just leave a comment 🙂
Happy coding!